Setting up a Linux environment on Windows using VirtualBox and PuTTY
As a Windows user who frequently develops on Linux I often find it convenient to have a local Linux environment to do work in. Projects like Foreign Linux, MinGW and Windows Subsystem for Linux get a close approximation but nothing beats having a real virtual Linux machine on your computer. In this post I will show you how to set up a Linux VM that you can connect to using PuTTY.
The end result will be the ability to open a linux shell in seconds. No need to worry about “Syscall not implemented” errors or tools that aren’t compatible on Windows. With modern linux optimizations on virutal machines performance is almost as good as native and very low idle overhead (see performance at the end).
Who is this for?
Anyone who can copy commands into linux. Whether your an absolute beginner or just don’t want to scour the internet for the right steps, this tutorial is set up to let you just copy commands into linux.
The setup
Make sure you have the latest archlinux iso, PuTTY (putty.exe and puttygen.exe) and VirtualBox.
Setting up the machine
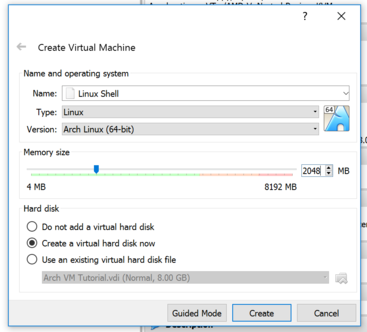
Create a machine in Virtualbox using the guided setup. You should give the VM at least 256MB memory, but preferably at least 2GB. Keep in mind Virtualbox will not allocate memory Linux isn’t using. Your hard drive should be at least 3GB, but the default of 8GB is preferable. Again, keep in mind a Dynamically Sized VDI will not use space on your real hard drive until it is touched by Linux. Make sure the OS is set to Linux and Arch Linux 64-bit.
When you first boot, Virtualbox should prompt you to select an installation medium. Select the Arch ISO you downloaded earlier. Otherwise, open the machine settings and attach the ISO to the empty optical drive under the IDE controller in storage. If the text on the VM is too small scale up the display under the video tab.
Once arch is booted select the installation option.
The Arch Linux install
Arch Linux will be the OS of choice given it’s lightweight and customizable. We don’t want to be weighed down by a graphical interface, for example. If your having trouble with the installation, consult the official installation guide.
Arch Linux gets a bad rap for not being beginner-friendly, but once installed its as simple as any other distribution. Furthermore, Arch is known for its huge number of resources, like Arch Wiki and helpful community. In other words, if your just a beginner, don’t fret.
Check your internet and setup package sources
The installation ISO does not contain everything needed to install arch on the disk, so an internet connection is needed to download packages.
# ping google.com
If you don’t have internet check your machine settings under the network tab and make sure your host internet works. Don’t continue until you have internet.
Package sources are available in the /etc/pacman.d/mirrorlist file. When
downloading, pacman will go through this file in order until it finds a mirror
that works, so move sources closer to your location to the top.
# vim /etc/pacman.d/mirrorlist
In my case, this means moving the first few sources labelled United States towards to the top. This file will be copied to your system to be used after the installation.
# timedatectl set-ntp true
Accurate time is necessary for encrypted network connections. The time may already be accurate without this.
Partition and format disk
First, find the name of the hard drive your trying to format.
# lsblk
NAME    MAJ:MIN RM  SIZE    RO  TYPE    MOUNTPOINT
sda       8:0    0    3G     0  disk
sr0      11:0    0  756M     0  rom     /run/archiso/bootmnt
loop0     7:0    0  328M     1  loop    /run/archiso/sfs/airootfs
The virtual drive will be the one that hasn’t already been mounted and matches
the size of the one we created earlier. In this case sda.
The simplest way to format the disk will be a single partition booted using BIOS. This can be done using parted.
# parted /dev/sda
GNU Parted 3.2
Using /dev/sda
Welcome to GNU Parted! Type 'help' to view a list of commands.
First, format the drive as msdos. Then create the partition and make it bootable.
(parted) mklabel msdos
(parted) mkpart primary ext4 1MiB 100%
(parted) set 1 boot on
(parted) quit
After exiting parted, check that the partition has been created.
# lsblk
NAME    MAJ:MIN RM  SIZE    RO  TYPE    MOUNTPOINT
sda       8:0    0    3G     0  disk
-sda1     8:1    0    3G     0  part
...
We will format the new partition, /dev/sda1, as ext4.
# mkfs.ext4 /dev/sda1
And mount the filesystem.
# mount /dev/sda1 /mnt
Install Arch
The arch pacstrap command has the job of installing arch to the drive. In
this case, I install base-devel because I plan to use this for development.
This includes tools like make, sudo and gcc. I will assume you have these
installed for the rest of the tutorial, but they are also trivial to install
only when needed. The base package is required. I also install vim at this
stage, however nano is included in base.
# pacstrap /mnt base base-devel vim
Set your fstab file to automatically mount the drive.
# genfstab -U /mnt >> /mnt/etc/fstab
Now we’re ready to start doing work on our drive. Chroot into the system.
# arch-chroot /mnt
Install the grub bootloader.
# pacman -S grub
# grub-install /dev/sda
# grub-mkconfig -o /boot/grub/grub.cfg
By default grub will pause for 5 seconds before booting. This can be changed by
altering the GRUB_TIMEOUT variable in /etc/default/grub then running
update-grub.
Configure Arch
I’m going to breeze through most of this since the Arch Wiki does a good job explaining it. Essentially, we need to setup the timezone, locals, hostname and the root user.
# ln -s /usr/share/zoneinfo/America/New_York /etc/localtime

# hwclock --systohc --utc

# echo "en_US.UTF-8 UTF-8" >> /etc/locale.gen
# locale-gen
# echo "LANG=en_US.UTF-8" >> /etc/locale.conf

# echo linux-dev > /etc/hostname
Obviously if you live in a different time zone or need a different locale find the one you need and use that instead.
Change the root password.
# passwd
Exit chroot and shutdown.
# exit # exit chroot
# shutdown -h now
In the VM settings under Storage, remove the installation ISO from the disk drive. When you restart you should be able to boot into the drive we installed Arch to.
Setup arch to work with PuTTY
After testing that the VM is able to boot and login, shut down again.
Setup Internet
Our VM needs two connections: one to the internet, and the other to our host. Open the Network tab of the settings and enable the second adapter.
The first adapter should be “NAT” and will be set up automatically. This gives the VM access to the internet, but doesn’t give any way for our host to reach it. This is solved by the second adapter which should be set to “Host-only Adapter”. The Virtualbox Host-Only Adapter should appear in Windows task manager under Performance.
Boot and login to your VM.
Enable and start dhcpcd. This will automatically configure the network.
# systemctl enable dhcpcd
# systemctl start dhcpcd
Run ip addr repeatedly until your assigned an IP.
# ip addr
1: lo: <LOOPBACK,UP,LOWER_UP> mtu 65536 ...
    link/loopback 00:00:00:00:00:00 brd 00:00:00:00:00:00
    inet 127.0.0.1/8 scope host lo
       valid_lft forever preferred_lft forever
    inet6 ::1/128 scope host
       valid_lft forever preferred_lft forever
2: enp0s3: <BROADCAST,MULTICAST,UP,LOWER_UP> mtu 1500 UP ...
    link/ether 08:00:27:7f:dc:35 brd ff:ff:ff:ff:ff:ff
    inet 192.168.56.102/24 brd 192.168.56.255 scope global enp0s3
       valid_lft forever preferred_lft forever
    inet6 fe80::63aa:9ffe:d962:cd46/64 scope link
       valid_lft forever preferred_lft forever
3: enp0s8: <BROADCAST,MULTICAST,UP,LOWER_UP> mtu 1500 UP ...
    link/ether 08:00:27:50:e3:04 brd ff:ff:ff:ff:ff:ff
    inet 10.0.3.15/24 brd 10.0.3.255 scope global enp0s8
       valid_lft forever preferred_lft forever
    inet6 fe80::aca5:92ee:42f8:95cf/64 scope link
       valid_lft forever preferred_lft forever
In Virtualbox, look under File->Preferences->Nat Network to find the subnet of
the selected NAT and match it to the correct IP. The other network (ignore
the loopback adaptor) is the host-only adaptor. In this case, enp0s3. If
you are not assigned an IP for the NAT make sure “Supports DHCP” is checked.
To setup PuTTY correctly, it’s important the host-only adaptor always uses the same IPv4 address. This can be configured in dhcpcd.
# echo "interface enp0s3" >> /etc/dhcpcd.conf
# echo "static ip_address=192.168.56.101" >> /etc/dhcpcd.conf
After, you must restart dhcpcd.
# systemctl restart dhcpcd
Install virtualbox guest additions
This isn’t strictly necessary but will give better performance and make shared folders easier.
# pacman -S virtualbox-guest-utils-nox
Choose virtualbox-guest-modules-arch when prompted. If you choose the dkms
option make sure you also install the proper kernel headers.
Load the vbox modules.
# modprobe -a vboxguest vboxsf vboxvideo
After a reboot you should be able to use paravirtual features such as the paravirtual network driver, which may improve performance. You may need to reconfigure the network.
Create a new user
It’s considered bad practice on Linux to do work as the root user. This new
user will be the one you should work from. If root is required, you can
use sudo or su. Note the vboxsf group is necessary for shared folders.
# useradd -m -G vboxsf -s /bin/bash eric
# passwd eric
Add the user to the /etc/sudoers file, so we no longer need to login as
root.
# visudo
In this case I would add the following line under the User Specifications section, although it could technically go anywhere in the file.
eric ALL=(ALL) ALL
Logging in with PuTTY
Install, enable and start OpenSSH.
# pacman -S openssh
# systemctl enable sshd.socket
# systemctl start sshd.socket
You should now be able to login and continue working from PuTTY. After you login with IP from earlier, check that sudo works.
$ sudo echo success
Entering your username and password every time is inconvenient, so we will setup public key login.

On Windows, run the PuTTY Key Generator and generate a new SSH-2 RSA key. Save this key somewhere on your computer, such as in the directory your VM is stored in.
In PuTTY, copy the text area with the public key starting with ssh-rsa. Open
~/.ssh/authorized_keys in nano and paste (right click) the key in. You may
have to create this file. Remove any newlines within your key.
$ mkdir ~/.ssh
$ nano ~/.ssh/authorized_keys
Since you are just creating the authorized_keys file set the permissions to readonly for other users.
$ chmod 700 ~/.ssh
$ chmod 600 ~/.ssh/authorized_keys
In order to use public key authentication we need to enable it in openssh.
Open /etc/ssh/sshd_config and uncomment/add the following two lines.
RSAAuthentication yes
PubkeyAuthentication yes
Restart the OpenSSH service.
$ sudo systemctl restart sshd.socket
On PuTTY, when connecting to the VM, select the private key file you saved earlier under Connection->SSH->Auth. You can use Saved Sessions to connect automatically to the right server.
Performance
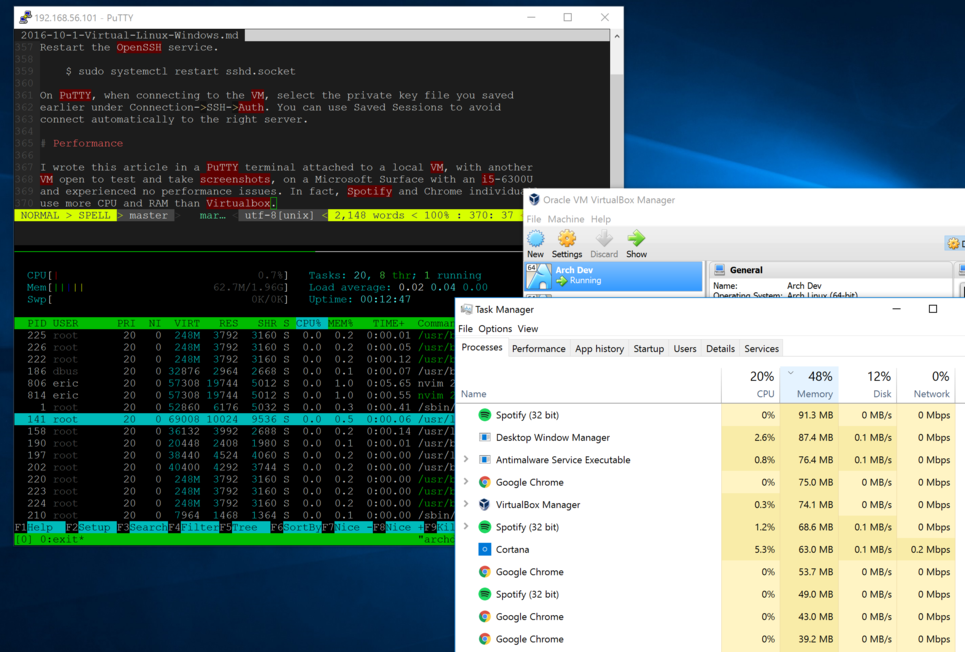
I wrote this article in a PuTTY terminal attached to a local VM, with another VM open to test and take screenshots, on a Microsoft Surface with an i5-6300U and experienced few performance issues. In fact, Spotify and Chrome individually use more CPU and RAM than Virtualbox. Doing more intensive tasks like compiling gives comparable, though longer, results to doing them on Windows.
A fresh install of Arch takes about 1.5GB, but will grow as you add tools.
tmux, ZSH and themes
As functional as PuTTY+Linux is, the current setup is a bit drab. This short section will outline how to enable tmux with full mouse support, along with zsh and the agnoster theme. I purposely chose this theme because it looks cool and requires a special font that isn’t obvious how to setup.
Both tmux and zsh can be installed using pacman.
# pacman -S tmux zsh
Enabling tmux mouse support requires one line in ~/.tmux.conf.
$ echo "set -g mouse" > ~/.tmux.conf
Test it out by running tmux, opening 2 panes using ctrl-b % and dragging
the dividing line up and down using your mouse. Additionally you can drag
to select text in tmux and copy/paste using tmux’s built-in keyboard (to select
text, copy or paste to/from the Windows keyboard use shift-right/left-click).
The agnoster theme requires oh-my-zsh to be installed.
$ sh -c "$(curl -fsSL https://raw.githubusercontent.com/robbyrussell/oh-my-zsh/master/tools/install.sh)"
Following the setup, set your ZSH_THEME to agnoster in ~/.zshrc. Before
the theme is fully functional, PuTTY must first be setup with the correct fonts.
Download DejaVu Sans Mono for Powerline.ttf from the Powerline font
repository. Open and click “Install”
at the top of the Windows Font Viewer. Select this font in PuTTY under
Window->Appearance->Font Settings. Update your settings under Saved
Sessions.
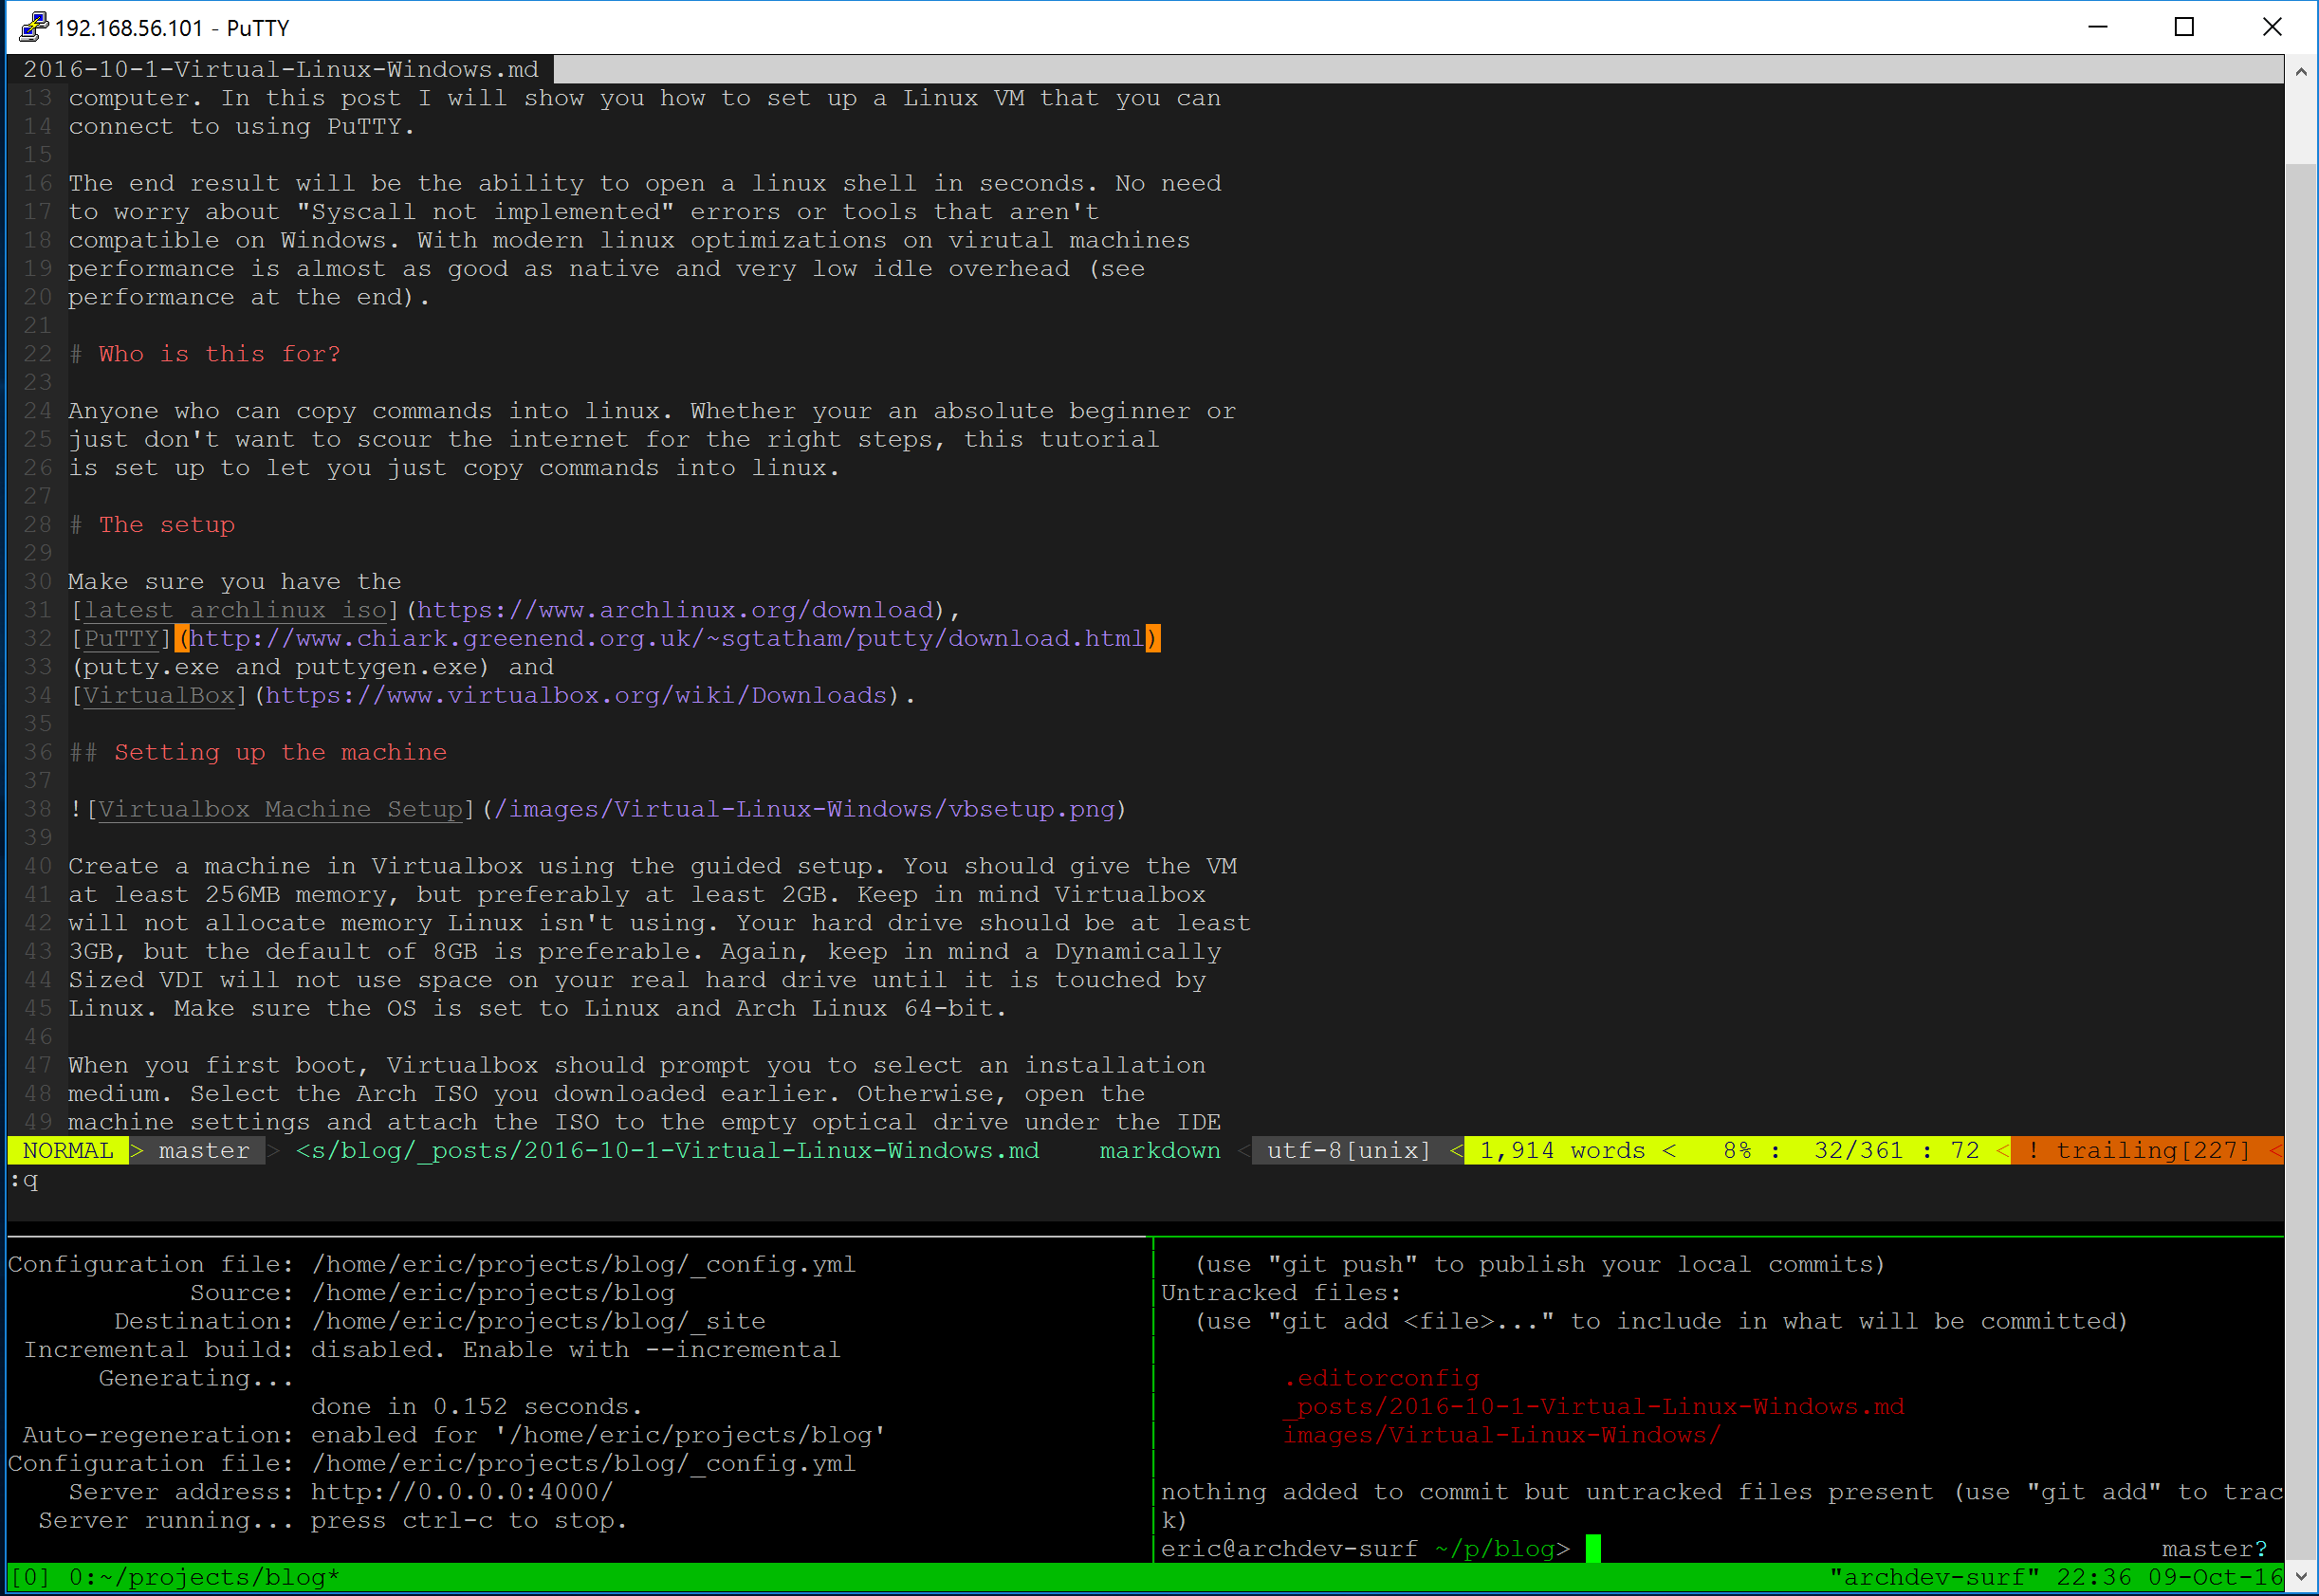
My personal setup includes zsh and tmux with full mouse support and shared
folders to allow easy data transfer. I wrote this in neovim with jekyll
automatically building my changed using jekyll serve --host=0.0.0.0.
The more customized your setup is, the more fun it is to use.